Sara, of Handy Crafts did a fabulous, expensive looking doormat out of a rubber doormat, river rocks, ad rubber cement, all for $12. She credits Curbly.com for the inspiration.
Go visit Sara and admire her handiwork.
As always, if you try this yourself, be sure to share a picture.
I wonder how this would work with the bag of mosaic tile I've had for the past decade but never did anything with.
Monday, September 29, 2008
Wednesday, September 24, 2008
Gift Stash?
Since I posted about this subject on my other blog, I thought I'd ask the question here.
The question?
Do you have a gift stash?
I'm asking mostly to figure out if I should start one of my own.
If you're not familiar with the concept, a gift stash works like this. Say, you're a knitter and you see a pattern for a hat you'd like to make. You find the yarn for it in your yarn stash and knit the hat. But you don't need a new hat and you're not sure who you'd give it to. So you put it in the gift stash and when you need to give someone a gift, you can check the gift stash before going shopping, or knitting something especially for the recipient.
With other crafts, especially frugal crafts, you might say to yourself, "hey, I could make a whatsit out of these thingies here that I was just going to throw out." If you don't have an immediate need for a whatsit, then you can put it in the gift stash. I suspect that if you don't have a gift stash, you'd just give up and throw out the thingies instead of using them to make something.
So a gift stash can be extra frugal because it would keep you from having to buy gifts when you've already made something suitable. It also means that you can make that whatsit, or hat, or arigurumi toy without any time pressure. That time pressure can turn into finishing a two year old's birthday present several months late. (Yes, there's an unfinished pillow sitting on my coffee table. Why do you ask?)
So, do you have a gift stash?
Tuesday, September 2, 2008
Patch Job
If it's a crafty way to be frugal, is it also a frugal craft? I'll save the contemplation of such weighty matters until I've had a little more coffee.
Hadley, of Hadley Gets Crafty had posted a tutorial for patching up jeans and cutoffs. Check out the last picture. Her shorts don't look patched, they looked embellished!
I suppose you could even take it further by continuing the stitching all over.
As always, be sure to share pictures if you try this yourself.
Friday, August 22, 2008
Craft Challenge Completed
The follow up to yesterday's post, which is actually from December 2007.
Once I had made enough gifts to fill out my gift-giving list, I lost steam. I'm more interested in the finished product than the process, so I didn't feel like turning my stash of craft supplies into a stash of future gifts that might never find the right recipient. So no drawers have been emptied in the course of this challenge, but many cool and well received presents have been made.
First up, the initial ornaments. I've made these in the past and they're always a big hit. Little kids like their initials.

To make them, just shape some Sculpey into the recipient's initial. When forming them, if you can't just wrap a hook around the letter itself (like with that letter M), then make holes. Bake it, let it cool and then start mixing up paints. I have a set of acrylics that I use. I mix up the colors in the plastic containers my disposable contact lenses come in.

In the past, all the ornaments have been for girls, so I've gone with pinks and soft blues and so on. We have a baby boy in the family now, plus 1 baby girl and an adult woman I'm giving ornaments to, so for the boy, I used the primary, unmixed colors, or mixed, but masculine-looking colors, and then combined with other colors to make more feminine shades.
You need to paint one side, let it dry and then paint the other. I was able to store some paint over night in old contact lens cases. But mostly, I had to mix fresh colors. Here's a look at the back so you can see the differences.

Then I took some wood and craft paper ornament shapes I had left order from a few years ago. Or, 7 years ago, in fact. I have one half-painted one that says 2000.
I painted them up and added the recipient's initial and the year. (I'm all about the initials because most of these are gifts for kids and some are siblings. Which ornament belongs to which kid is not a fight I want to leave the parents with.)


I actually cheated a bit on this one. The round ornaments had one side painted ages ago. I never got around to painting the flip side.

There was no hope of my matching the paint colors, but I tried to stay in the same neighborhood.
Then I had a little more fun with Sculpey.

We've been needing one of those Clean/Dirty magnets since we moved into our apartment (which comes with a dishwasher). We've been making do with words from my Magnetic Poetry kit, but it's not quite the thing. I made 3 squares, baked and painted. One is for us, and 2 are gifts. I had a bare magnet on the fridge, cut it into quarters and attached to the sculpey with double sided mounting tape. I only did the one for us at first, in case the tape wasn't strong enough and it fell apart under use. So far, so good and I attached the magnets to the other 2. I'm looking forward to making more magnets this way.
I'm glad I did this, even though I didn't use up as much stuff as I'd hoped. I'll remember to dive into my non-knitting stash when I'm thinking of gifts in the future.
Thursday, August 21, 2008
The Holidays Come Late
Last year, for the holidays I set myself a Craft Challenge that was definitely Frugal Crafting.
Here's the first post about it. Tune in tomorrow for the second. They're all crafts that can be done comfortably in the hot weather (unlike knitting a gigantic afghan wedding gift which I am totally going to finish before their first anniversary next June).
What with that whole wedding thing, I promised myself no knitted gifts this year. But now that I've been laid off, at least some handmade gifts are going to be necessary. Preferably things that won't take as long as knitting.
Oh look, 6 whole drawers of craft supplies. Oh, yeah, plus that box in the closet. Hmmm, and there's that box of yarn in the living room because there's no room for it in the closet or my craft drawers*.
Hey, what if I use up some of these craft supplies to make presents? By using up this stuff, I'll have more room for yarn and I'll have more space for my stuff because I'll have less stuff. It'll be just like cleaning, but with paints and glue.
So that's the challenge I'm threw at myself this month (well, on top of that whole job hunting thing). How much will I be able to use up? Will I actually manage to empty a drawer? Let's find out!
First up, I took a page from Practical Polly's book and made some pretty notebooks.

(Instructions in the linked post above.)
I used up some wrapping paper I had in the closet, and some white printer paper that had been victimized in the incident known as That Time I Knocked Over My Coffee Onto All of My Good Printer Paper. Only the edges of some of the sheets were stained, so I held onto them for scrap. I also used up some purple printer paper that I've had lying around.

Instead of sewing like Polly, I just cut triangular notches in the spine and tied the notebooks together with a double-knot/double-bow combo. I was totally being artistic with the notches. It has nothing to do with The Great Where The Fucking Hell Has My Hole Puncher Gotten Off To Mystery. Nothing at all.
*I just realized that knitting my yarn into sweaters is really just a way of moving the yarn from one closet (craft closet) to another (clothes closet). Duuuude. Like, Duuuuude.
Monday, August 18, 2008
Fang
Another frugal craft from Fashionably Late to the Party.
This time for Mother's Day.
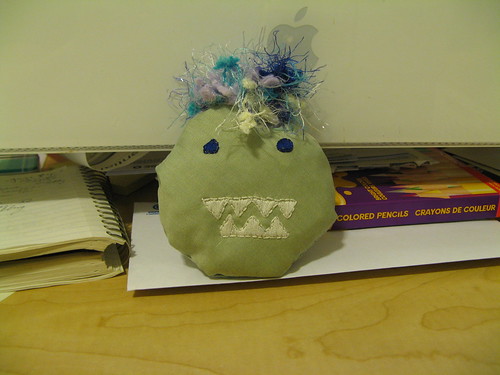
Meet Fang.
Fang enjoys pina coladas, walks in the rain and biting students who misbehave in class. (Mom teaches junior high--'nuff said.)
I made Fang pretty much the same way that I made Horace. I used a large yogurt container to trace the shape for the template. And then discovered that he was too small for my smallest embroidery hoop. But I cannot be thwarted that easily. I pinned on extra fabric to make him temporarily bigger.
I took that picture after I was done with the embriodery because I didn't bother reaching for the camera beforehand--bad blogger!
And he fit!
And that is the story of Fang. Mom brought him to school and the principal and the other teachers insisted that she keep him on her desk in the classroom, along with the note about how he bites poorly behaved students. Just as you always suspected--the teachers do like to mess with the students' heads sometimes.
This time for Mother's Day.
Meet Fang.
Fang enjoys pina coladas, walks in the rain and biting students who misbehave in class. (Mom teaches junior high--'nuff said.)
I made Fang pretty much the same way that I made Horace. I used a large yogurt container to trace the shape for the template. And then discovered that he was too small for my smallest embroidery hoop. But I cannot be thwarted that easily. I pinned on extra fabric to make him temporarily bigger.
I took that picture after I was done with the embriodery because I didn't bother reaching for the camera beforehand--bad blogger!
And he fit!
And that is the story of Fang. Mom brought him to school and the principal and the other teachers insisted that she keep him on her desk in the classroom, along with the note about how he bites poorly behaved students. Just as you always suspected--the teachers do like to mess with the students' heads sometimes.
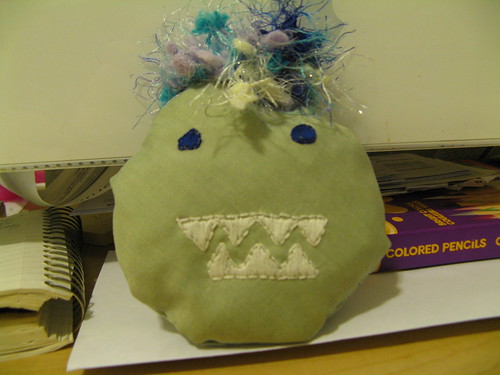
Horace
Excepted from a post on my other blog, Fashionably Late to the Party.
I made a present for my cousin's son's 1st birthday present. Entirely out of things I already had.
Inspiration: Craft Magazine's Hand-Sewn Free Range Monsters in Volume 6
Supplies, in no particular order):
An old man's shirt. (One of HA's-the cuffs and collar were too frayed to wear)
Cardstock (leftover from the wedding invites--cardboard from a cereal box would have done just as fine)
Double-stick tape
embroidery floss and hoop
rotary cutter and mat (optional, but speed things up tremendously)
needle & thread
Iron & ironing board
 Isn't he cute?

 This went much more quickly when I re-remembered that I own a rotary cutter.

I made a present for my cousin's son's 1st birthday present. Entirely out of things I already had.
Inspiration: Craft Magazine's Hand-Sewn Free Range Monsters in Volume 6
Supplies, in no particular order):
An old man's shirt. (One of HA's-the cuffs and collar were too frayed to wear)
Cardstock (leftover from the wedding invites--cardboard from a cereal box would have done just as fine)
Double-stick tape
embroidery floss and hoop
rotary cutter and mat (optional, but speed things up tremendously)
needle & thread
Iron & ironing board
scissors
Erasable fabric marker
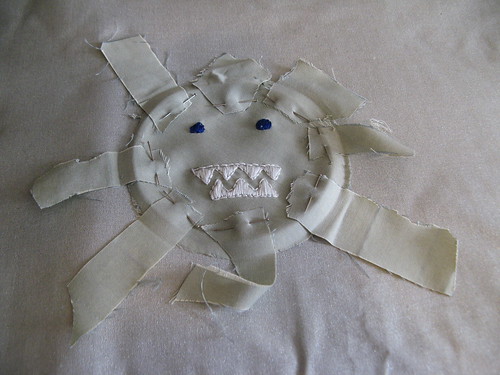
- I cut the sleeves from the shirt and cut off the seams. I had plenty of fabric to make my cuddly monster.
- I ironed the fabric, realizing for the first time ever that this might actually be an important thing. (If the fabric had been rumpled, I might not have cut both sides evenly.) I even folded the pieces in half and ironed a crease to make symmetry a bit easier.
- I sketched a few monster designs and when I settled on one, I drew on half of it on cardstock.
- I cut out the shape.
- I stuck the cardstock template to the fabric (folded in half, and stacked) with the double sided tape.
- I started to cut the fabric with scissors and then remembered that I own a rotary cutter and that sped things up.
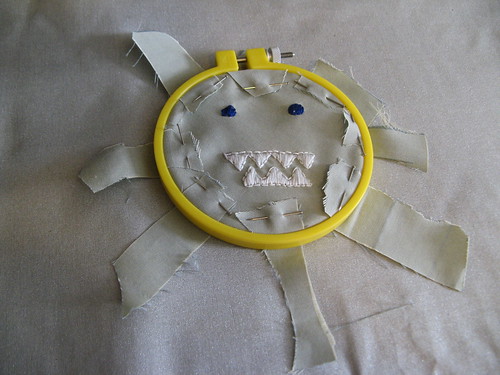
- I took one piece of fabric (Horace's face) and drew a face on him with the erasable marker. Great tool, that.
- I stuck Horace in the embroidery hoop and gave him a face with some basic stitches. (I covered all the marking with thread, otherwise this would've been the time to erase it. It magically fades in 2 weeks anyway.)
- I re-ironed both sides and ironed them again. Then I pinned the sides together wrong side in.
- I sewed it up, leaving a hole in the top of his head for stuffing. At this point, I remembered to take some pictures for the blog.
 Isn't he cute?
Then I turned him right side out.

But what to stuff him with? I do have some fiberfill, but it's not machine washable. Horace's new best friend is one years old. He's gonna get drooled on.
I'd heard about people stuffing toys with old clothes, so I decided to give it a try. I cut up some of the old shirt (cuffs, collar, seams, button bands--I left the large pieces for another project).
 This went much more quickly when I re-remembered that I own a rotary cutter.
 The one shirt wasn't enough, but I had saved the sleeves and collars from the t-shirts I used to make the calamari yarn, so I cut up some of that as well. (If you do this, remember to only use fabric lighter in color than the outside fabric, otherwise the color might show through. Though it might actually be kind of cool to do that on purpose. But don't do it accidentally.)
Once Horace was stuffed, I sewed up the hole and gave him yarn hair, following the instructions in the magazine. And there he is.

With any luck, the filling won't disintegrate in the washing machine. The sewing and embroidery took a couple of evening's TV-watching time, which cut into my knitting, but it was fun and a good change for my hands, which do get repetitive motion aches. And I doubt I'd be able to knit a toy as quickly, so there is that.
My yarn closet/craft closet is so stuffed full that I'm afraid to open it most of the time, so I'll be making an effort to use it up/get around to all those projects that I've been meaning to.
Subscribe to:
Posts (Atom)